
Unlocking Hard Drive Limits! Booting Windows on a ¥50 ZTE CT321G2 Mini PC with iPXE Diskless Boot
I’ll begin by explaining why I decided to do this. I was using Apple TV to stream games to my computer at home and discovered that the Bluetooth-connected controller didn’t have vibration feedback, although it does when connected directly to the computer. After experiencing the controller vibration in Horizon, there was no going back. I needed a cheap solution. Enter this mini PC, found on Xianyu (a popular Chinese second-hand marketplace) for ¥50. It has an x86/64 architecture, but only 2GB of RAM and a 4GB hard drive, leaving limited potential for customization. However, the CPU is similar to the J1900, and with four USB 2.0 and two USB 3.0 ports, it’s perfectly capable of extending the USB ports of my study computer and running some small programs.

I found a USB streaming software that only works on Windows, so I decided to install it on the mini PC. However, the 4GB hard drive storage was too limited for a full Windows installation. I also considered Windows To Go installed on a USB drive, but the cost of a compatible drive exceeded the price of the mini PC – unacceptable! So I landed on using the iSCSI diskless boot method. After several days of tinkering, I finally got it to boot successfully.
Required Files
- wimboot: Used to boot Windows PE.
- ipxe: This needs to be compiled yourself to embed your own script.
- Windows image
- USB drive: Use a tool like Rufus to write the Windows image to the USB drive. You can also mount the image to a Synology shared folder and, in Windows PE, use the
net usecommand to mount the folder containing the image and executesetup.exeto start the installation. I used a USB drive for convenience.
You can download and compile the required files yourself, or you can use my compiled version and image. Just note that the port number 6111 must be the same as mine.
Download link for (wimboot, compiled ipxe, Windows image, my ipxe boot script):
https://pan.baidu.com/s/1Lb69OU13pGFt-ff78TSGpA?pwd=1234 Password: 1234
https://url95.ctfile.com/d/44827295-61067476-560716?p=4681 (Access password: 4681)
0. Issues Encountered
0.0 Windows Version
The only Windows version that installed successfully was Windows 1607. Versions before and after this didn’t work. Don’t ask me how I know 😭.
I initially wanted to install Windows directly on the iSCSI hard drive on another computer and use it on the mini PC. However, I encountered an “inaccessible boot device” error when using the DISM command to extract files from the Windows image and write them to the iSCSI hard drive.
Later, I tried installing directly from a USB drive and encountered the same error. Finally, I determined it was an issue with the image. I will try directly writing to the iSCSI hard drive using the DISM command next time.
0.1 Synology iSCSI Format
The iSCSI hard drive I deployed on Synology is one target mapped to one LUN:
1 | sanboot iscsi:192.168.1.225::::iqn.2000-01.com.synology:diskstation.Target-win10 |
This could never connect. The colons :::: without anything between them represent default values. The third colon is followed by the LUN number. Online articles suggested using the default values with the sanboot command. However, it only booted successfully after I changed the LUN number to 1:
1 | sanboot iscsi:192.168.1.225:::1:iqn.2000-01.com.synology:diskstation.Target-win10 |
The part after the third colon is the LUN ID. If left blank, the default is 0. It seems Synology’s LUN mapping starts from 1.
0.2 Synology iSCSI Initial Login Permission Issue
If your Synology iSCSI target has permissions set, the first sanboot execution will fail to connect (“can not open SAN device”). To resolve this, go to the iSCSI target page in Synology SAN Manager and wait for the mini PC to execute sanboot. You’ll see the client IP connected in the iSCSI page of Synology SAN Manager. Click “create new host” and set read and write permissions for this client to access the LUN. Restart the mini PC and boot again – the connection should work.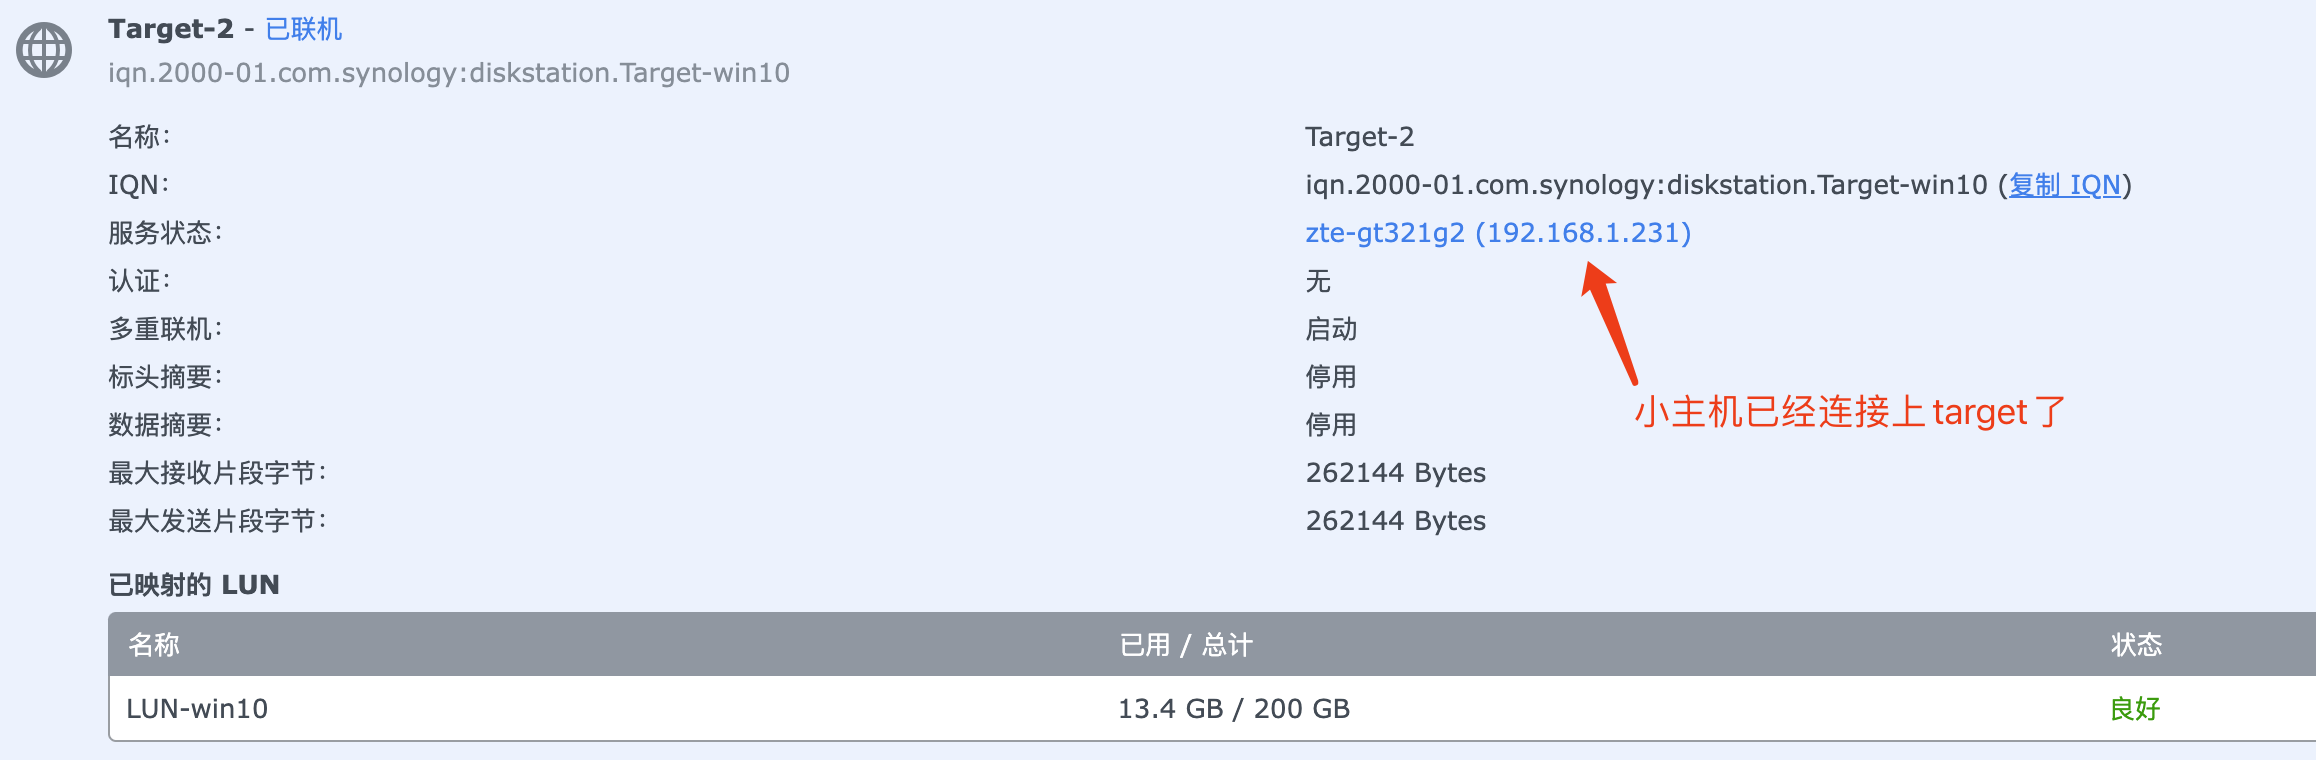
0.3 ipxe Compilation
If you’re using the ipxe I compiled, you can skip this part. If you need to compile it yourself, you’ll need an Ubuntu virtual machine or an Ubuntu Docker environment – you can’t compile it on macOS or Windows without complex cross-compilation commands.
Regarding the compilation command, the dependencies mentioned on the official website are outdated. I installed these:
1 | sudo apt install git |
Create a chain script named chain.ipxe in the src directory with this content:
1 | #!ipxe |
${next-server}:6111 is the more complete boot script I put on Synology Web Station. The variable ${next-server} is the address of the next server returned by the DHCP server, which I’ll explain how to set up in the “Configuring the Router” section. Now compile:
1 | cd src |
Go to src/myipxe/64, find ipxe.efi, copy it to the Synology Web Station directory, and use a browser to ensure http://192.168.1.225:6111/ipxe.efi is accessible.
Now, when the mini PC boots from the network, it can use ipxe to execute the commands in http://${next-server}:61111/boot.ipxe.
0.4 Network Port Issue
The network card in this host is a Realtek 8168, with an adaptive rate of 10/100/1000Mbps. After entering the system, the network interface showed 100Mbps. After some investigation, I discovered it was a network cable issue. I swapped the cable and the negotiated rate became 1000Mbps. However, a speed test on the intranet using librespeed only reached around 500Mbps – half the speed. Generally, this is enough.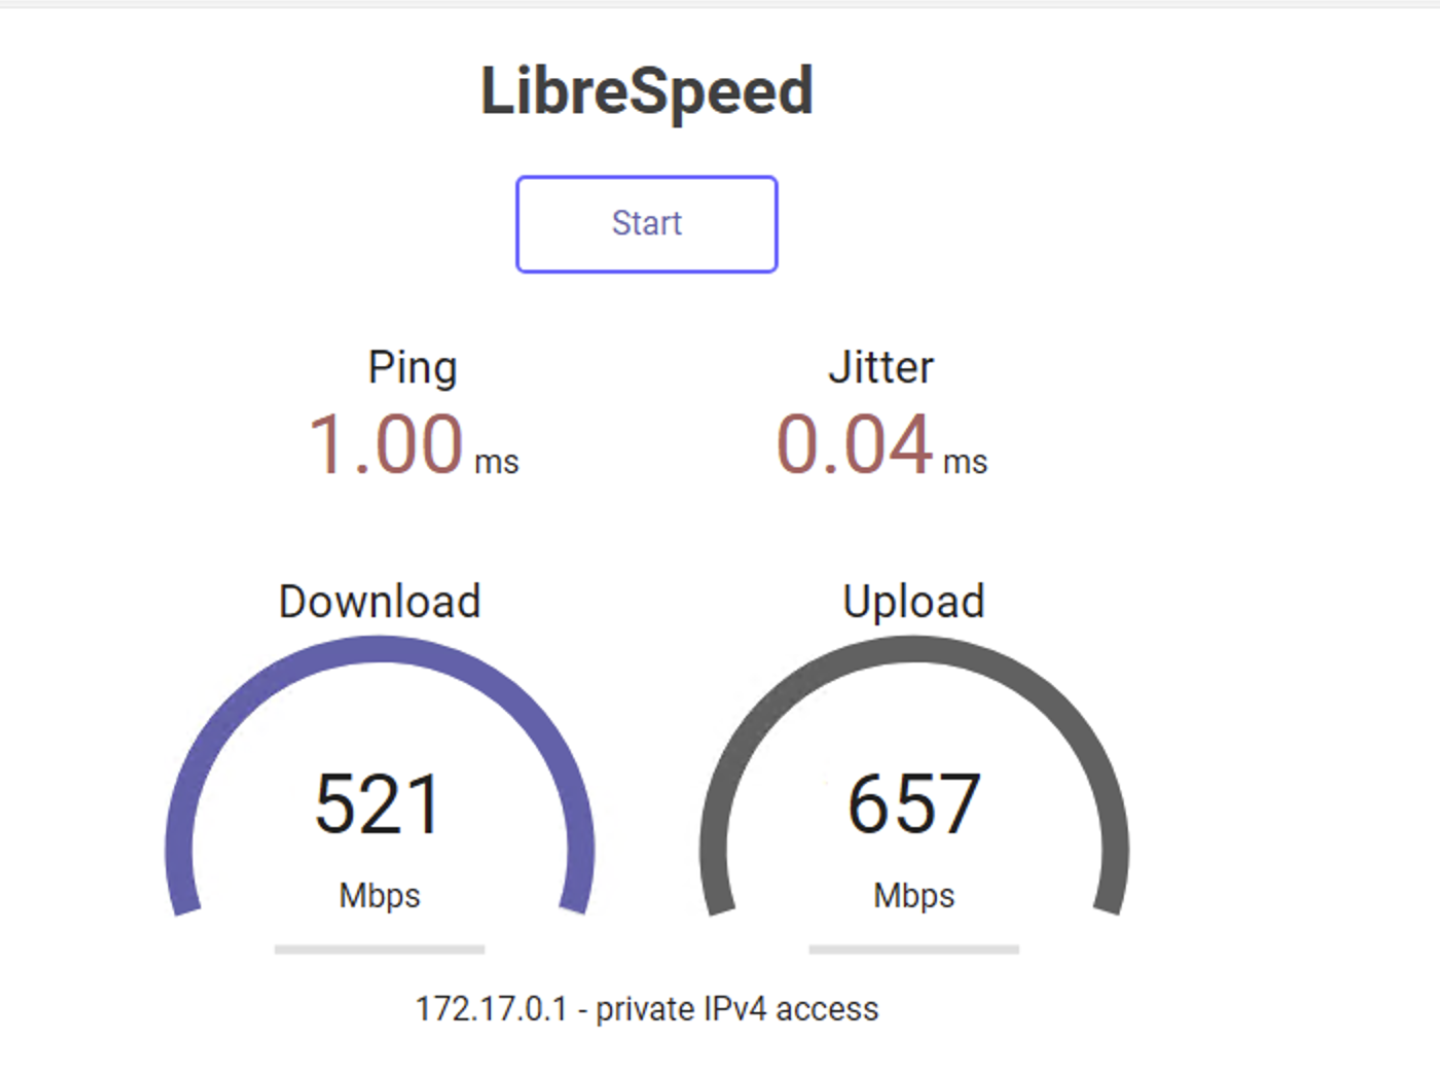
1. Installation Steps
1.0 Network Boot Flowchart
First, the complete PXE network boot flowchart:
![[ipxe引导示意图.excalidraw.svg]]
1.0 BIOS Settings
- BIOS password: zte-ct
- Change the BIOS boot order to network boot first.
- Change the IDE configuration from AMDAHCI to AHCI.
- Change the boot type to UEFI boot or dual boot type.
- Change the PXE boot capability to UEFI:IPv4.
Note: If you encounter issues with the BIOS and the device becomes unresponsive, you can reset it to factory settings by removing the battery, letting it discharge, and then reinserting it.
1.1 Configuring the Router
You need to configure the DHCP server on your router to tell the network card the address of the TFTP server and the name of the boot file. My router system is iStoreOS (based on OpenWRT). Go to Network->DHCP/DNS->PXE/TFTP settings and add the ipxe information: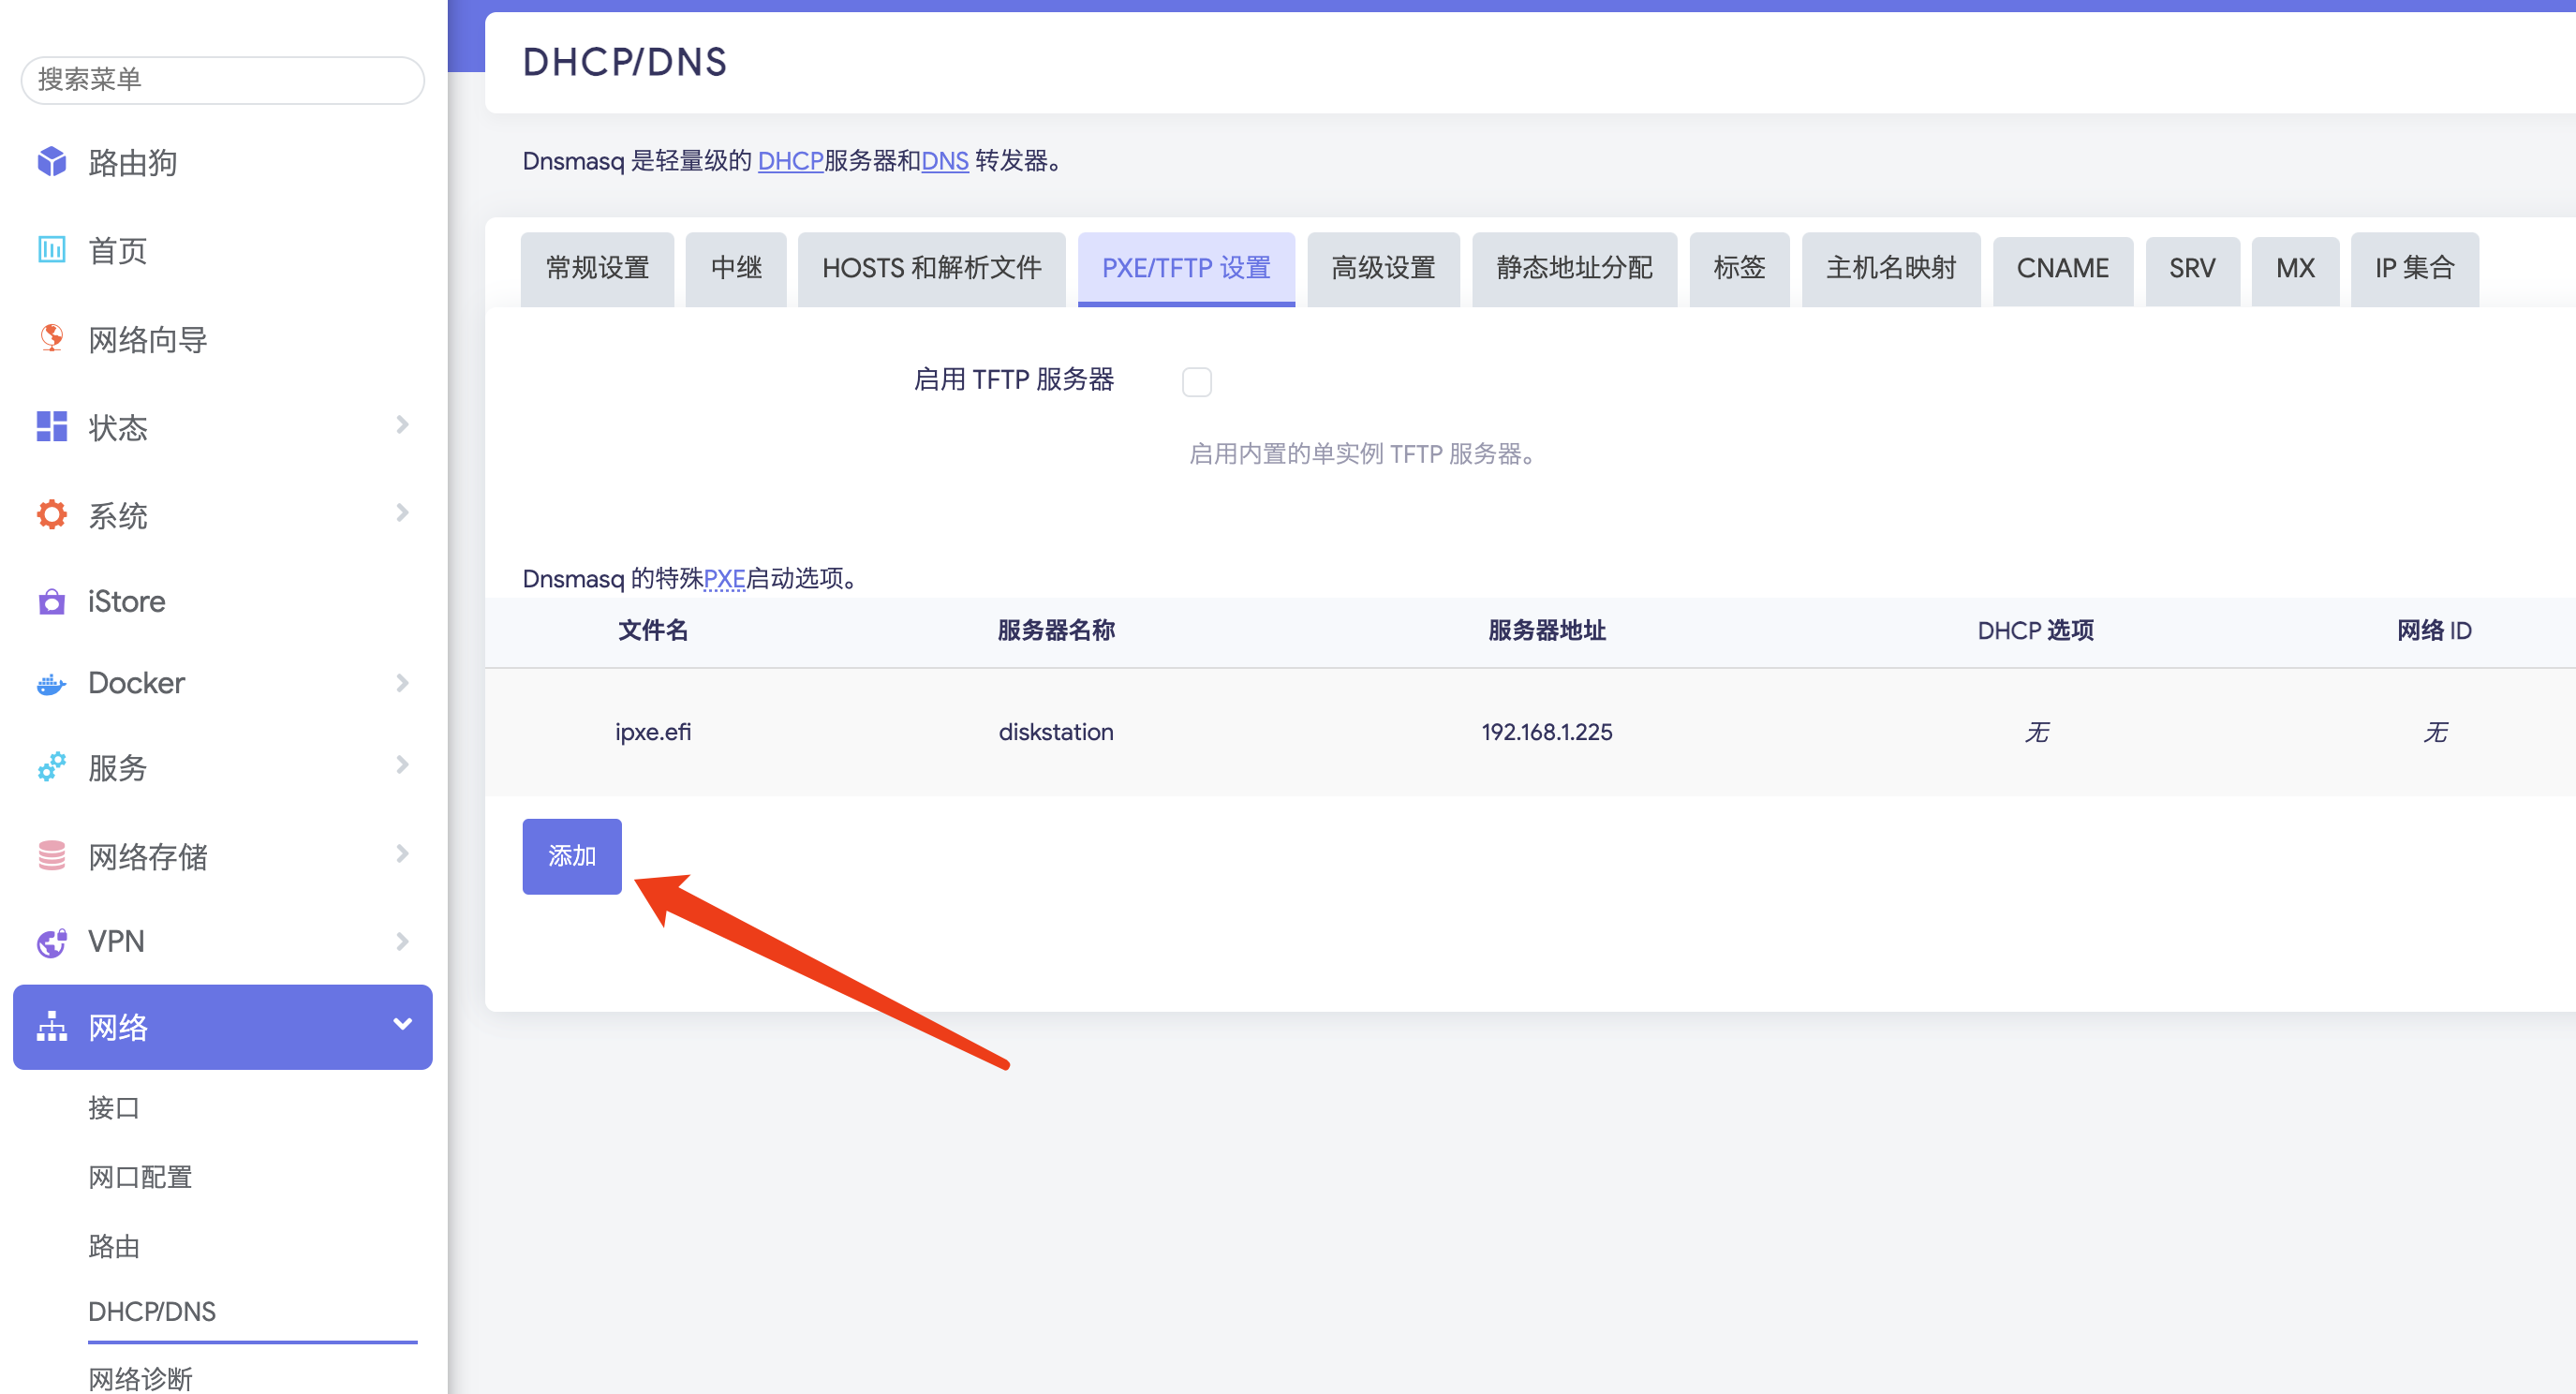
Enter the Synology IP address, name, and boot firmware file name: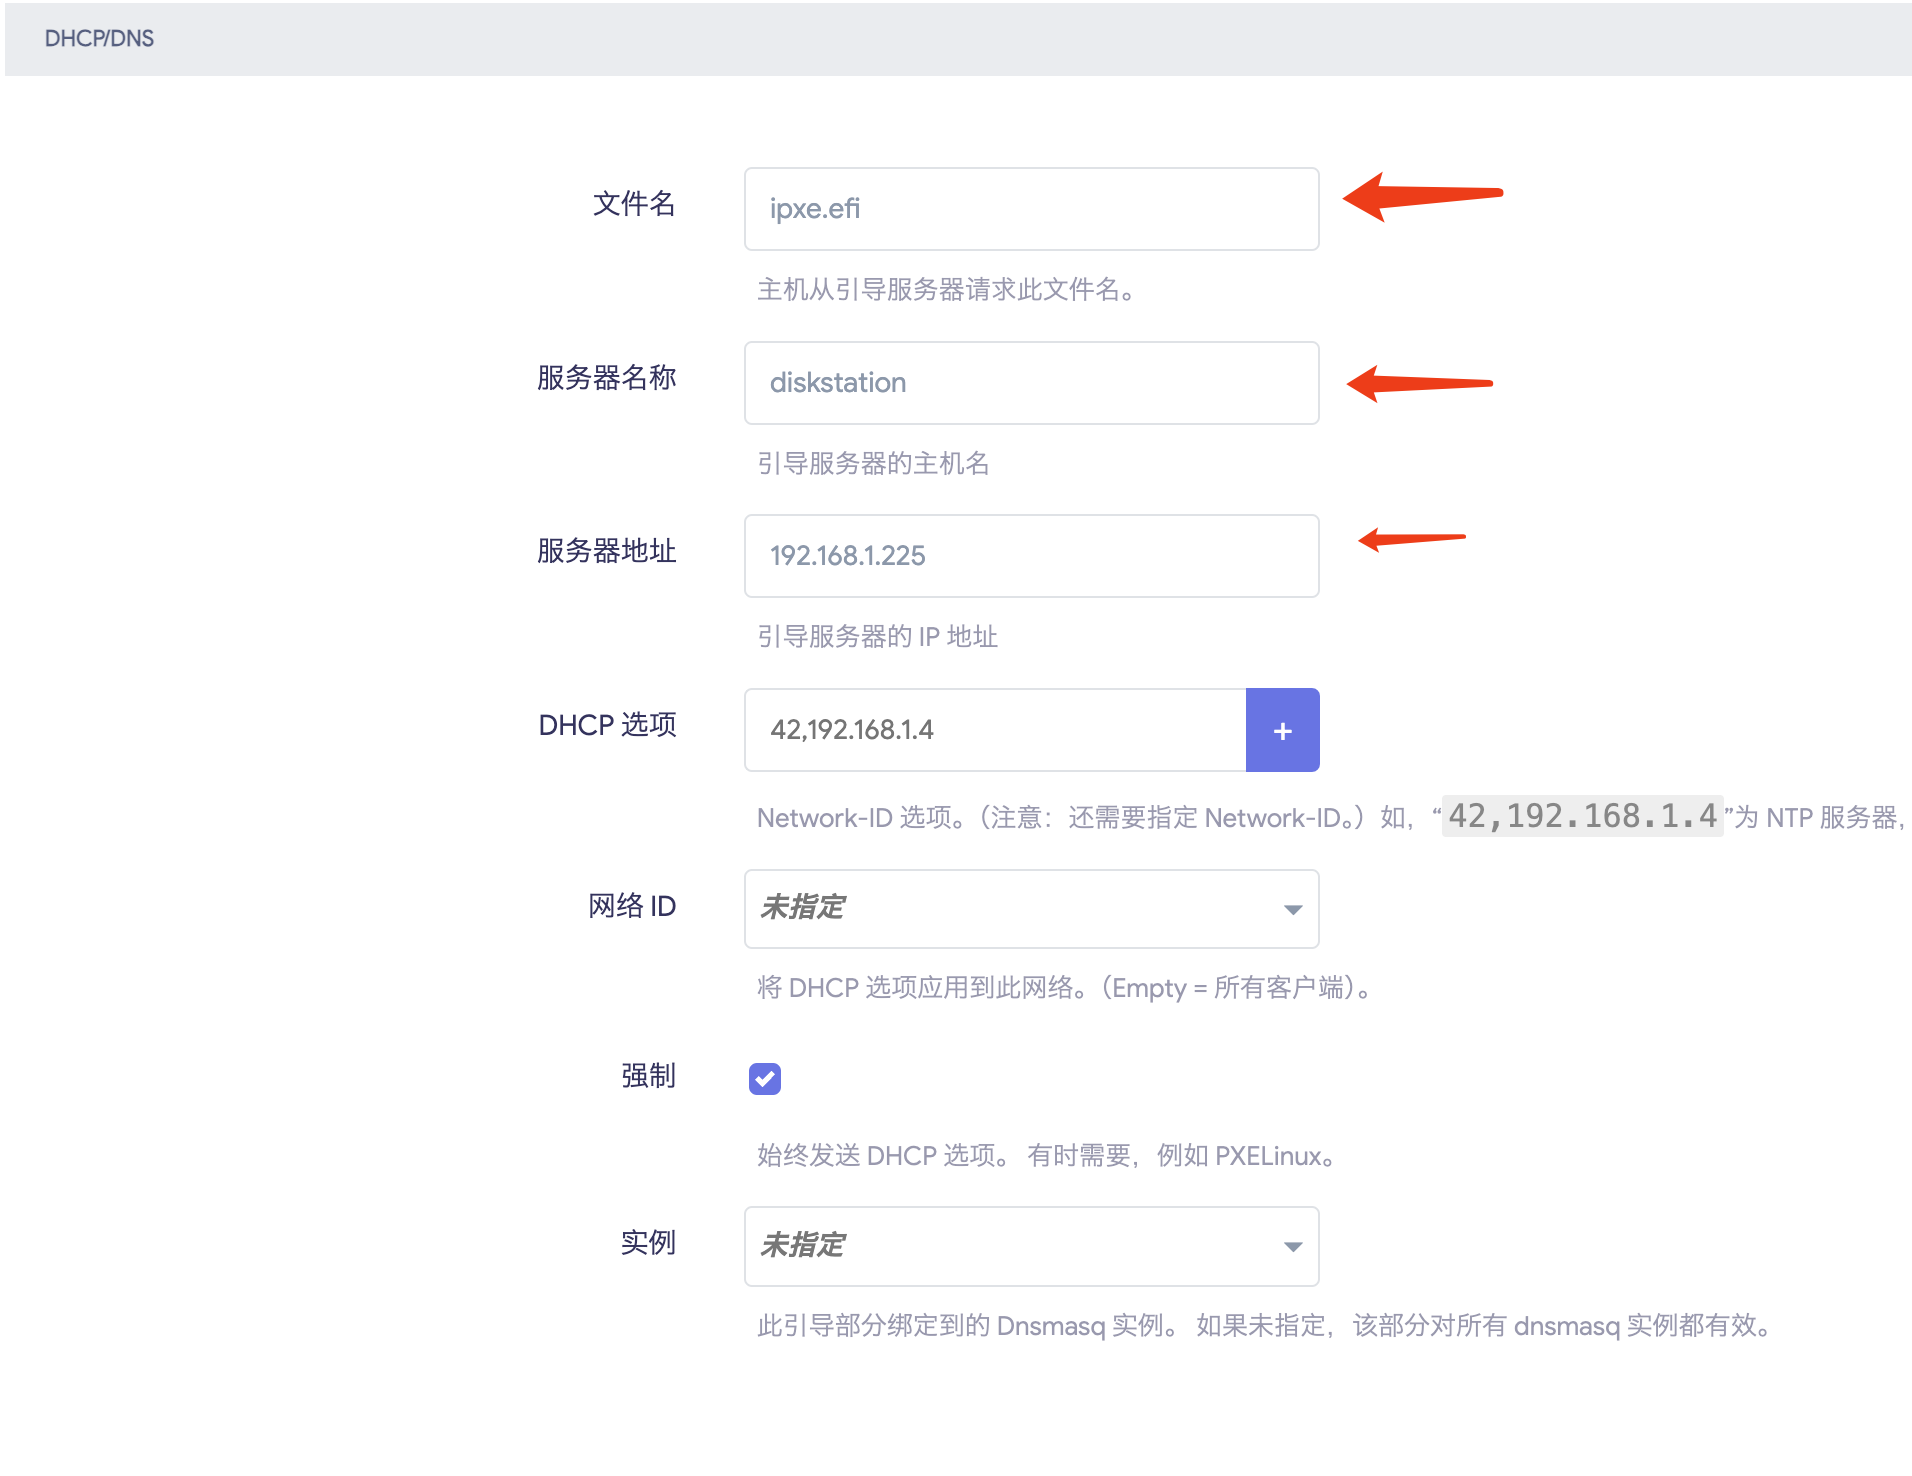
This tells the DHCP server where to download the boot file next.
Other routers are similar, and some have this function built-in. If not, you can turn off the DHCP service on the router and turn on the DHCP service on Synology, letting Synology provide IP address services to the intranet.
Note: If you use Synology’s DHCP service, you must disable the DHCP service on the router to avoid IP address conflicts.
1.2 Configuring TFTP Service on Synology
If your router supports TFTP, you can put the boot firmware on the router. For convenience, I put all the files on Synology for easy management.
Open the Synology page, go to Control Panel->File Services->Advanced Settings->TFTP, check “Enable TFTP service”, and set the root folder: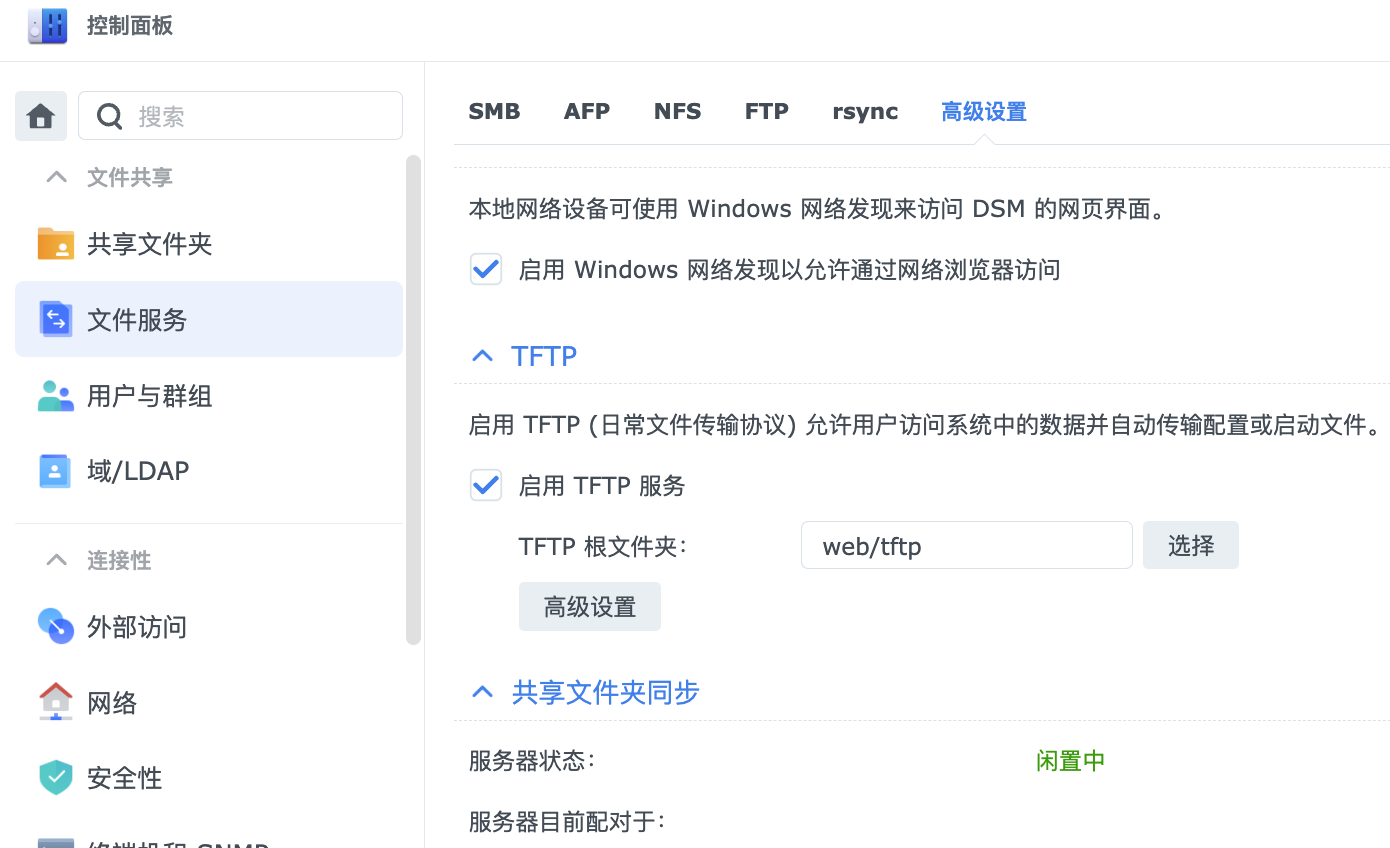
Put ipxe.efi in the /web/tftp directory (see the compilation method above).
As mentioned earlier, ipxe.efi embeds a custom script that uses the chain command to chain boot a new script:
1 | chain http://${next-server}:6111/boot.ipxe |
We do this because embedding the boot script into ipxe.efi makes it less flexible to modify. It’s more convenient to directly chain boot a new script. I also found that ipxe.efi seems to implicitly execute the autoexec.ipxe script when it starts, but I couldn’t find documentation for this on the official website. Feel free to experiment – if it works, you can skip compiling ipxe.efi and use the official release version directly.
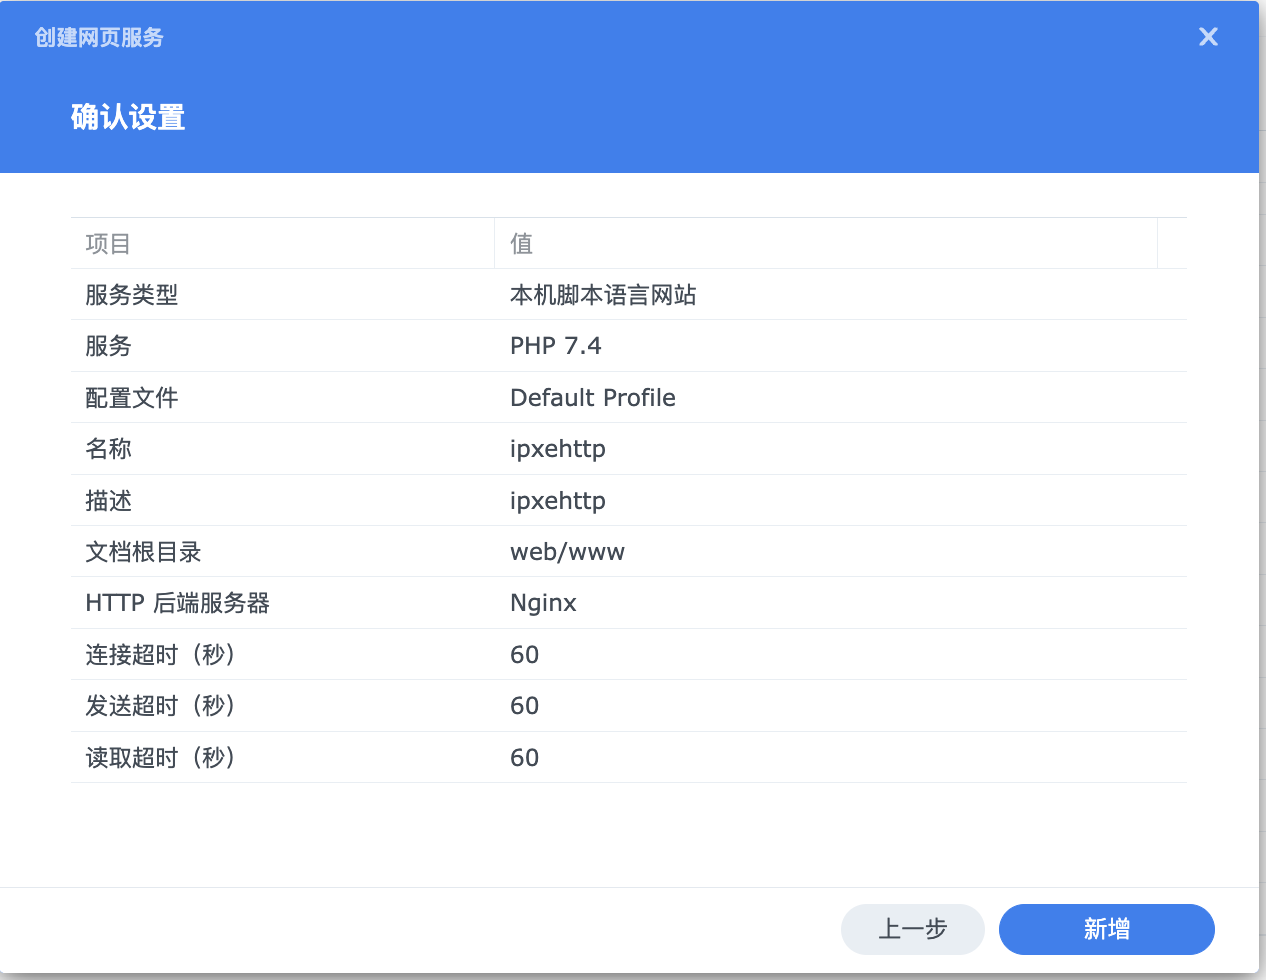
1.3 Create an HTTP Service on Synology Web Station, Set the Port Number to 6111 in the Script
Open Web Station->Web Service on Synology and select “PHP”: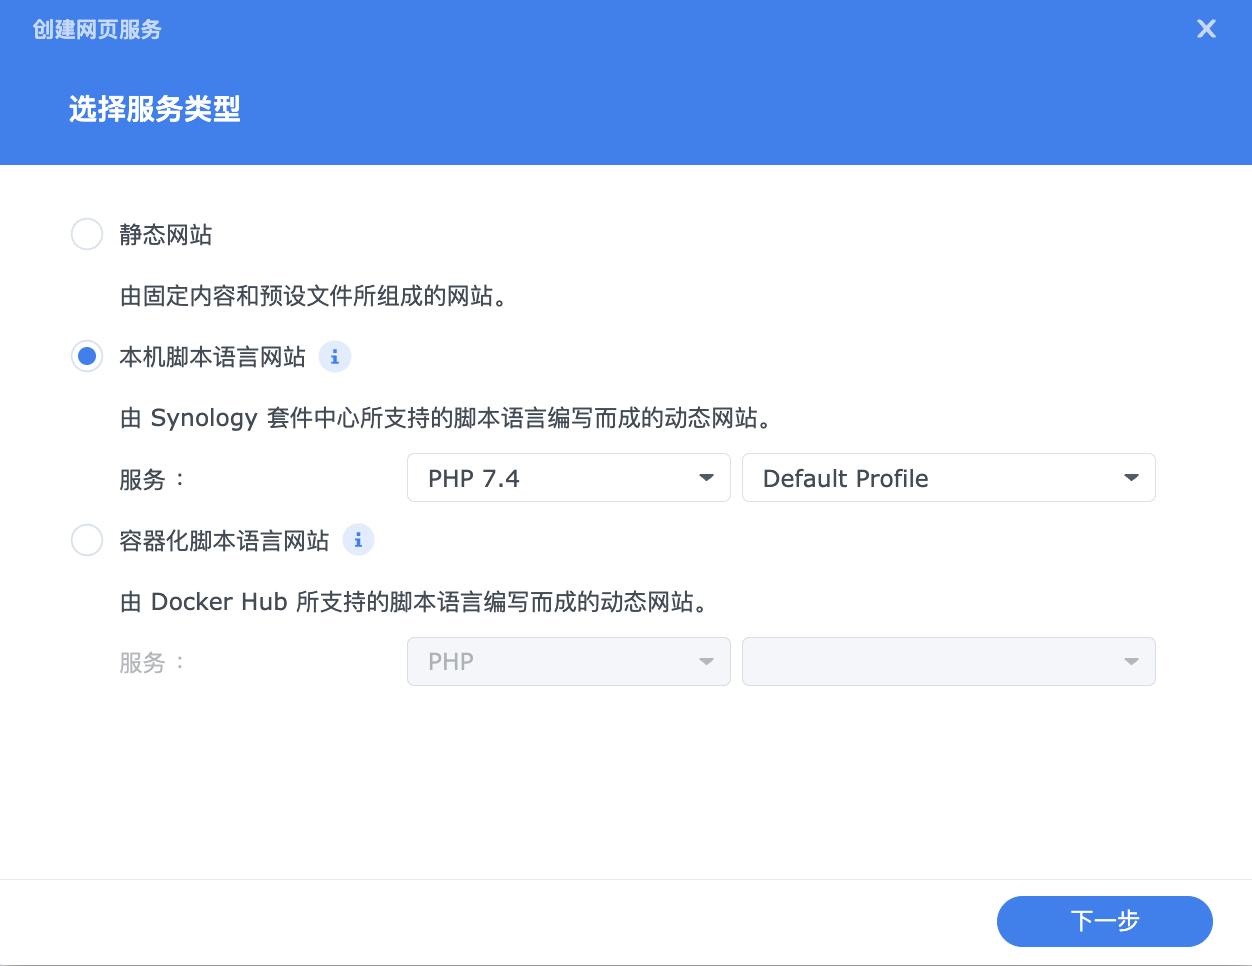
You can choose any name and description. Set the directory to web/www (create this directory yourself):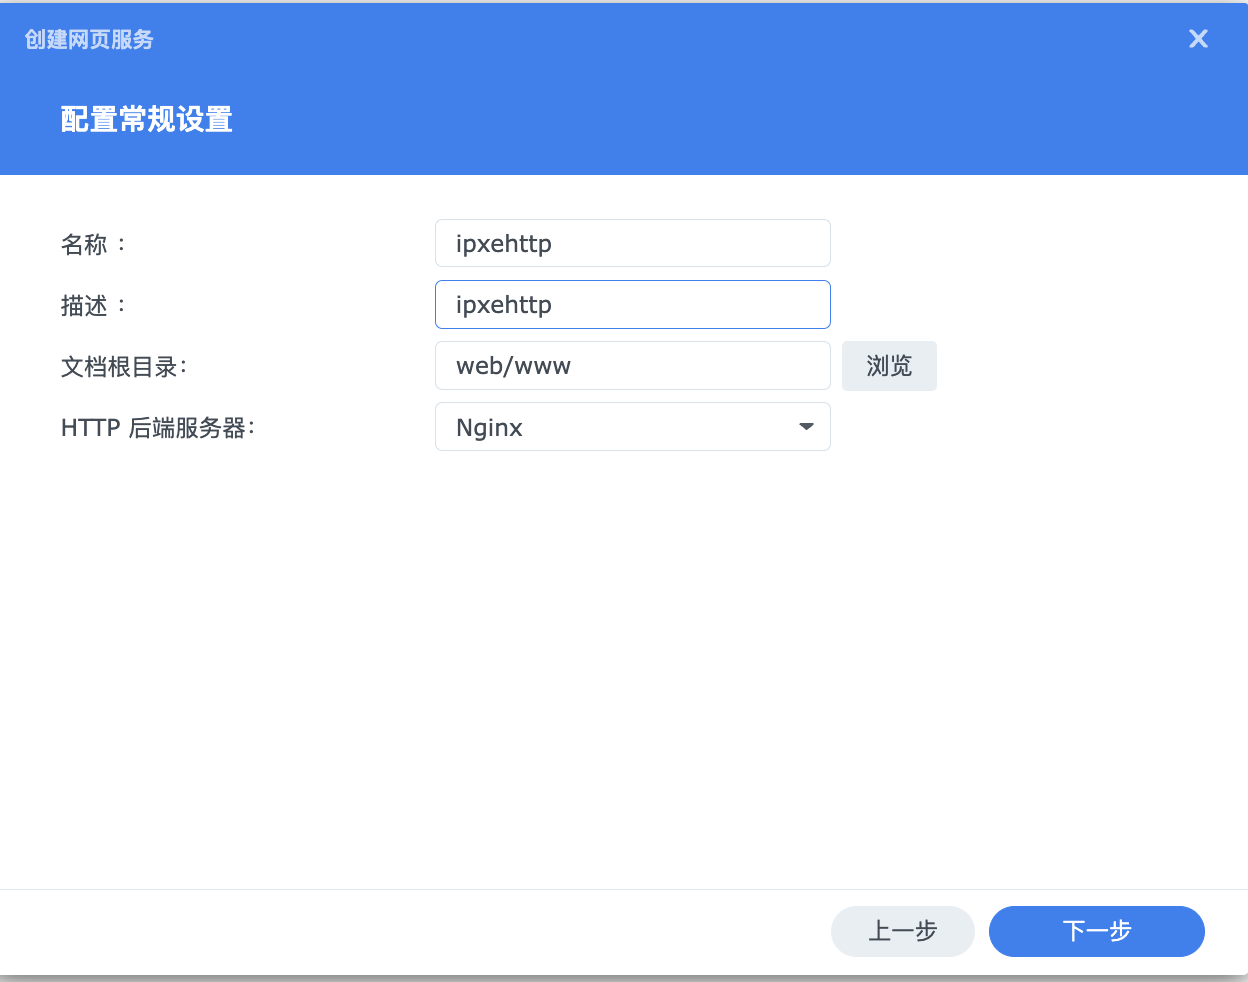
Add a new portal in the web portal: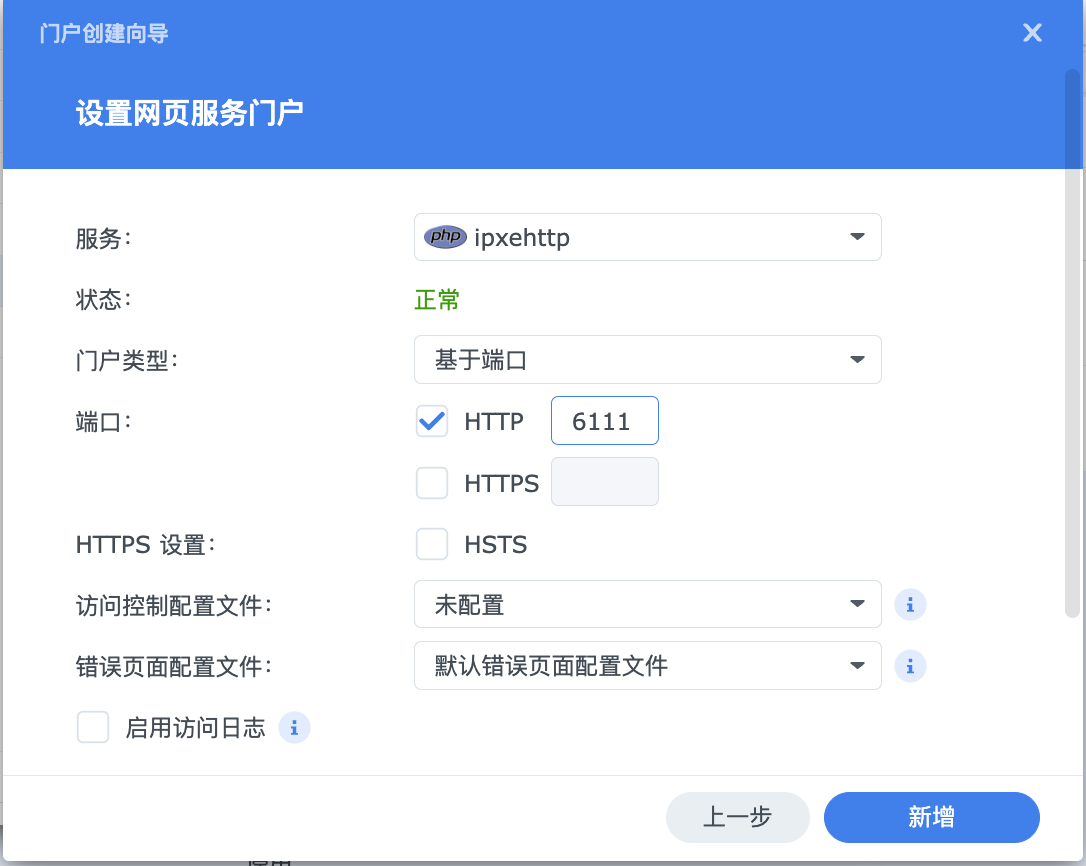
Put a file in the web/www directory and try to access it using the HTTP protocol. If you can read it, there’s no problem.
1.4 Creating Windows PE (Windows Preinstallation Environment)
This step lets us enter the Windows installer’s command line interface to start the Windows image on the USB drive, but not actually install Windows using these files. We’re creating a very simple Windows PE.
Mount the Windows image and copy these files to Synology’s web service root directory for port 6111, maintaining the directory structure:
1 | boot/bcd |
Put the wimboot file you downloaded earlier into this directory as well. The final web service root directory should look like this:
1 | wimboot |
Now we have a minimal PE pre-installation environment that can be booted by ipxe.
1.5 boot.ipxe Startup Script
I found some scripts online and modified them to implement two functions: booting from an iSCSI disk and entering the Windows PE environment we just created. Here’s the script:
1 | #!ipxe |
Put boot.ipxe in the web root directory, and then you can turn on the mini PC.
1.6 Installing Windows
First, insert the installation USB drive into the USB port. After booting, the mini PC will execute boot.ipxe, and you’ll see a menu. Select the “PE System” menu option.
This will load the PE environment. Note that this environment is a minimal setup designed specifically for this installation process. Clicking “install” will fail because the full set of files isn’t present. We’re using it to access the command line interface. Select “Repair computer”->”Troubleshooting” and then find the command line option: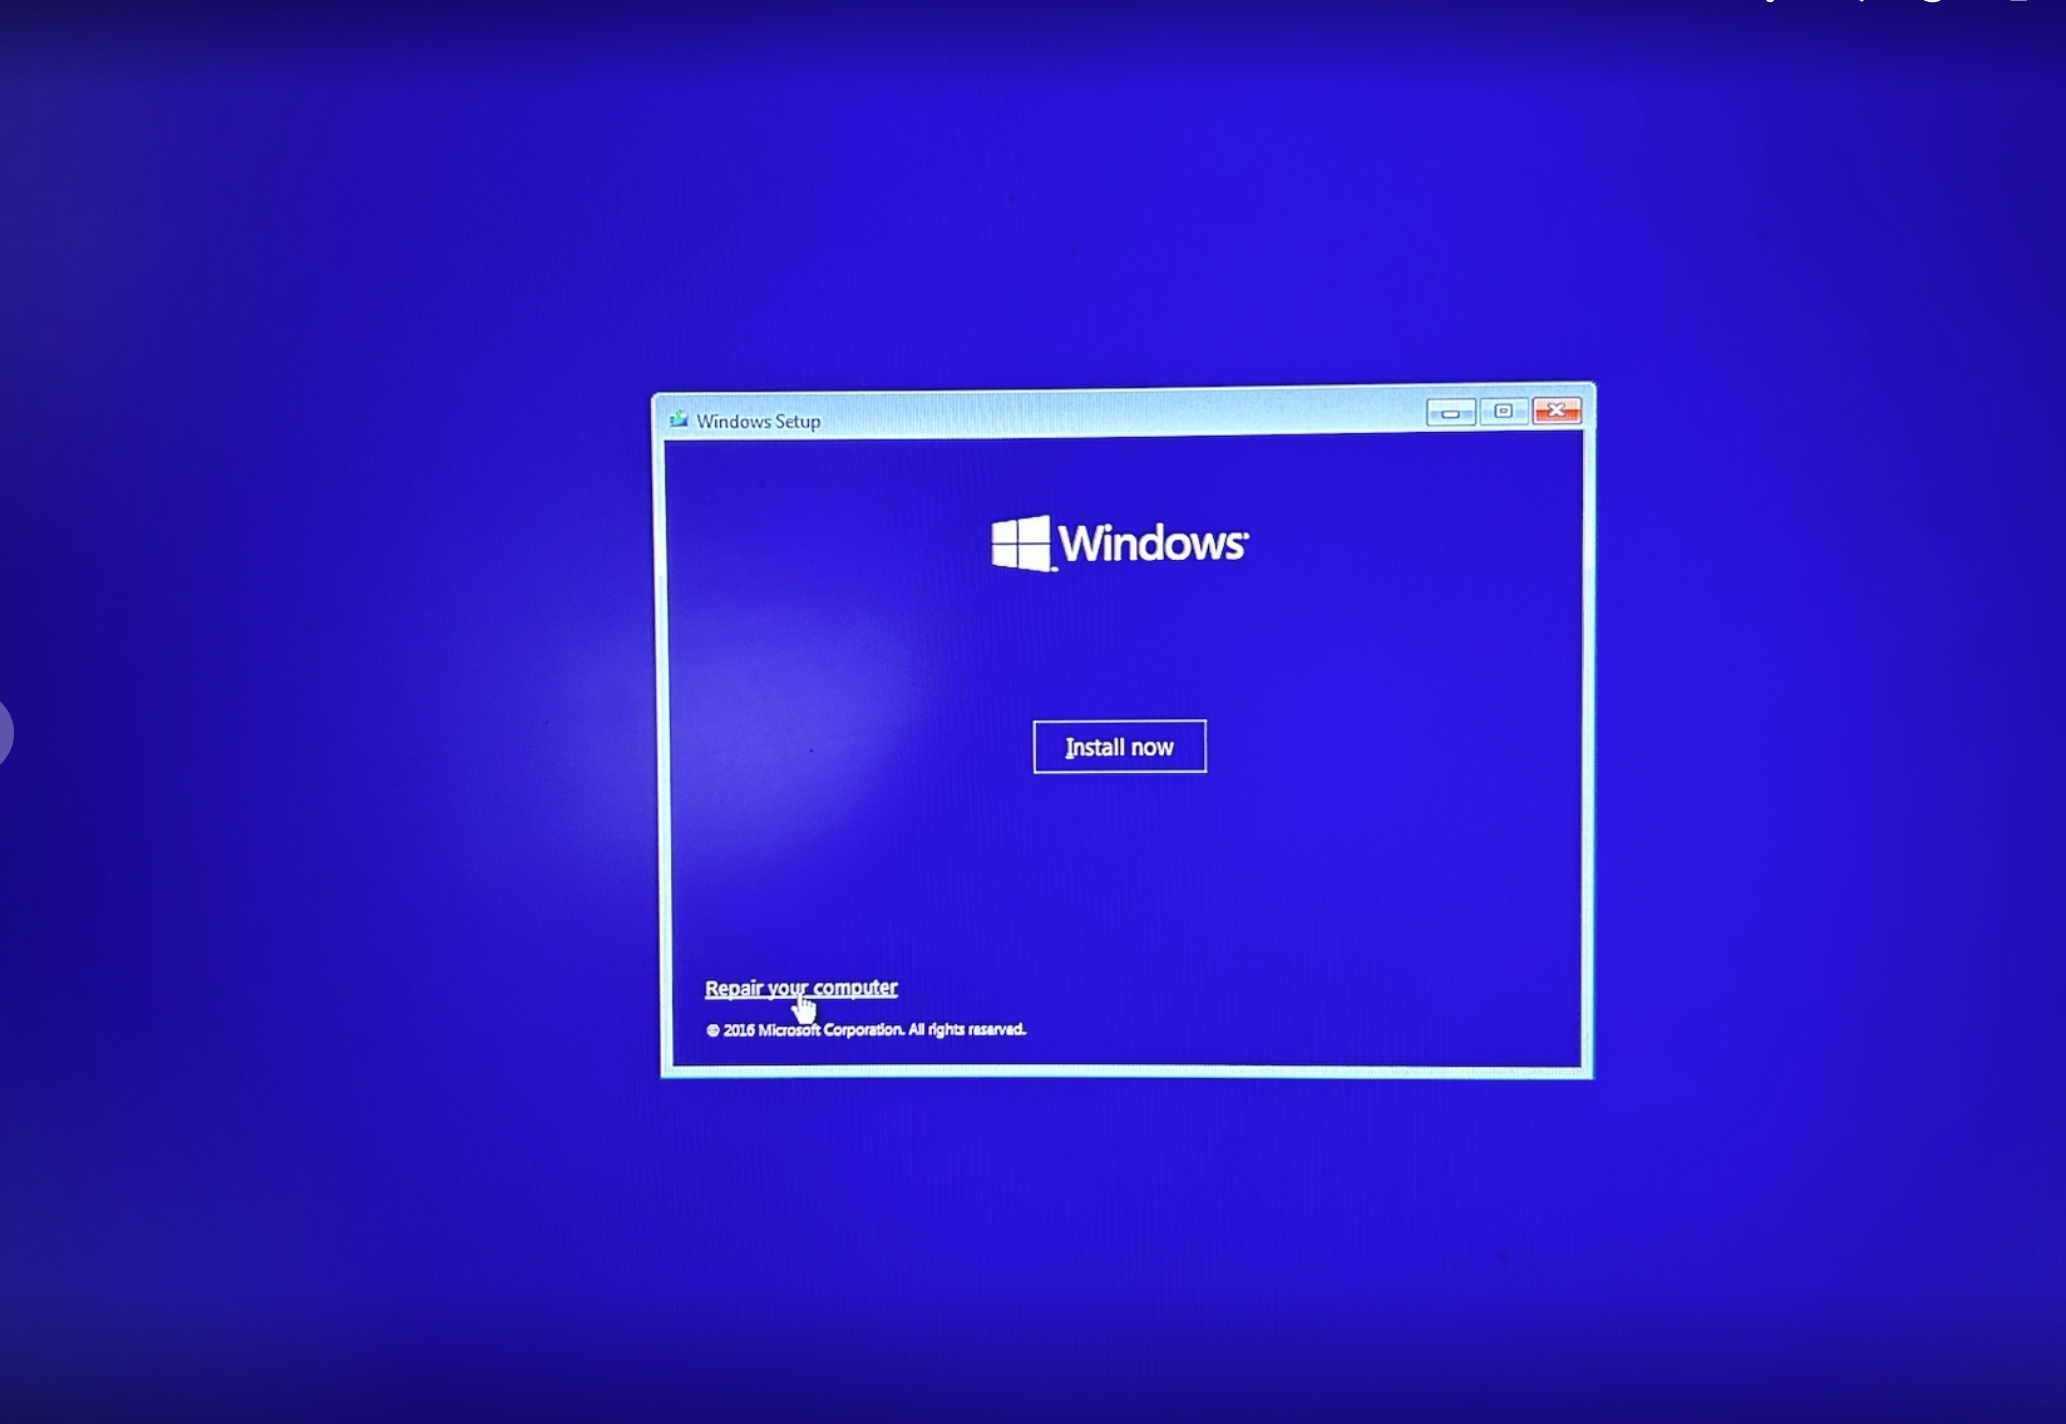
After using Rufus to write the Windows image to your USB drive, insert the drive into the mini PC. In the command line interface, use the dir command to find the USB drive’s letter (e.g., dir c:, dir d:). Once you’ve identified the correct drive letter, navigate to it using cd /d followed by the letter (e.g., cd /d c:\). Finally, execute setup.exe to launch the Windows installation program from the USB drive.
1.7 Directly Booting Windows on the iSCSI Disk
My boot.ipxe script boots Windows by starting different iSCSI disks based on the MAC address.
You’ll need to create a file at /mac/xx-xx-xx-xx-xx-xx under the web root directory. This is also a boot script, and its content should be:
1 | #!ipxe |
I wrote it this way to boot multiple hosts with one script. If you don’t need to network boot multiple computers, add these lines directly into boot.ipxe under the :WINDOWS section:
1 | :WINDOWS |
Now, select the “BOOT WINDOWS(ISCSI)” menu option at boot to directly enter the Windows interface.
Final Result
The CPU was almost fully loaded after installation. The original Windows installation runs several programs by default. This will settle down after a while. You can also use Windows optimization tools to disable unnecessary services.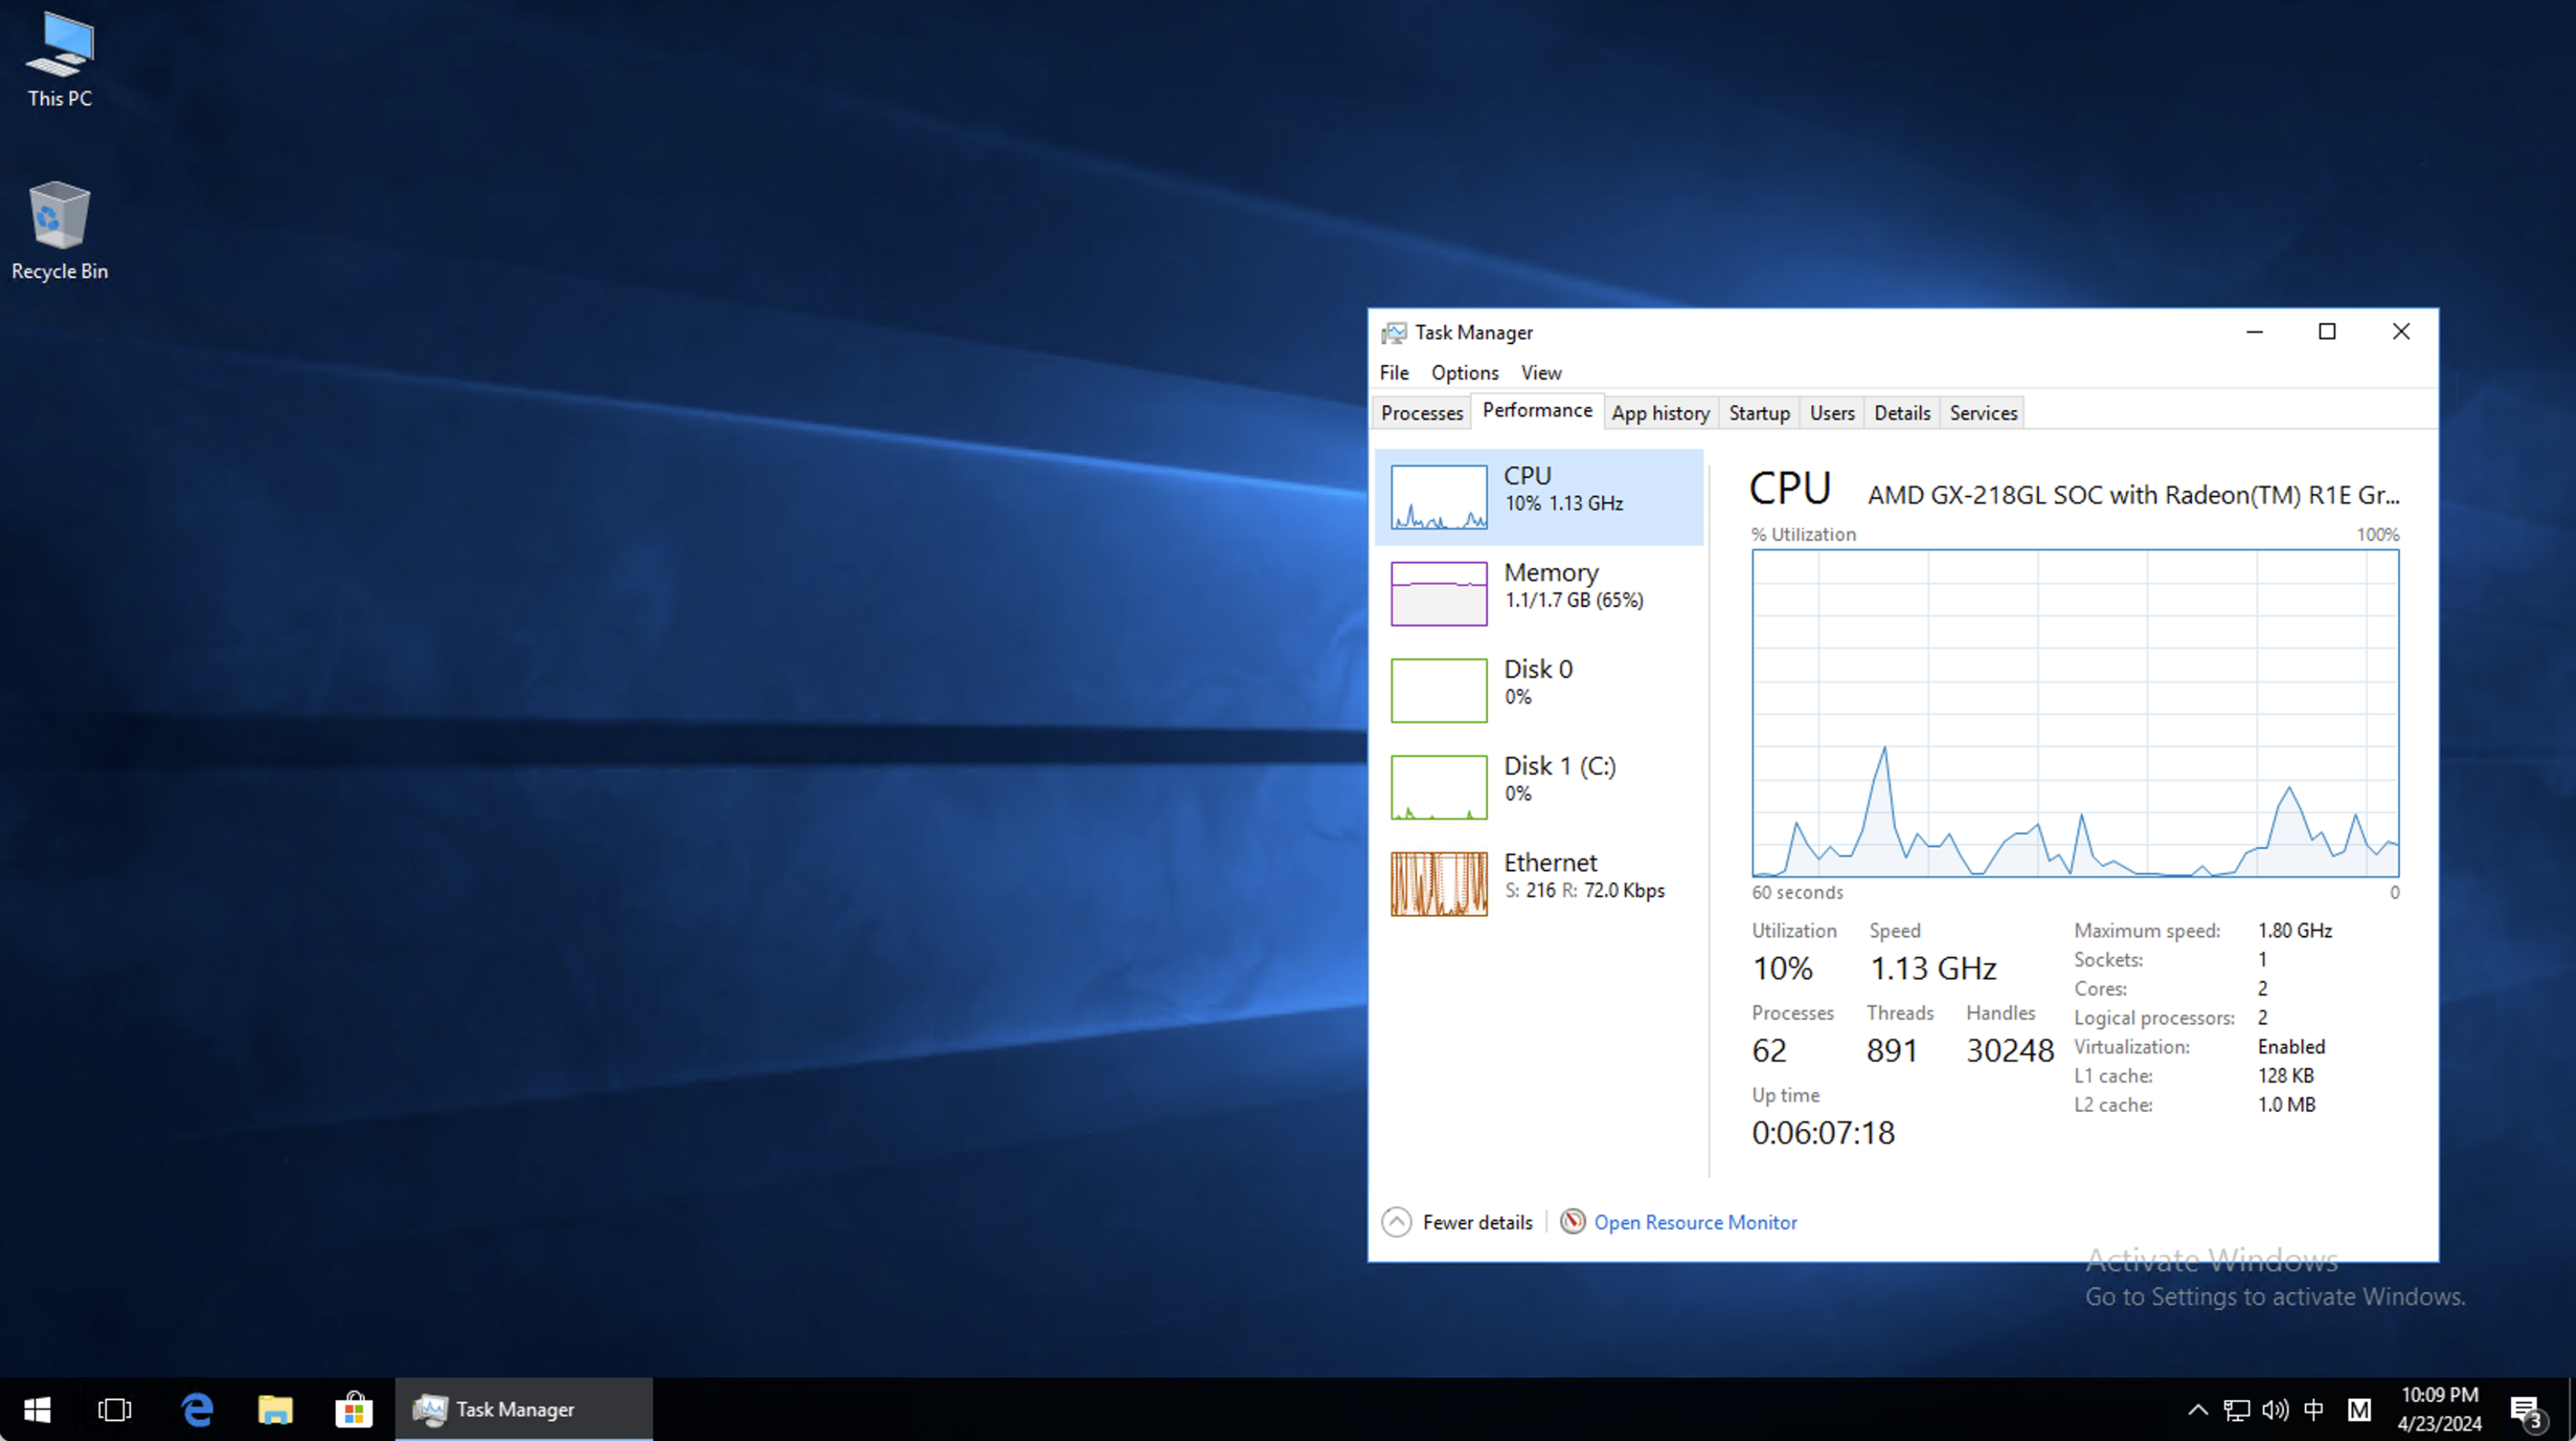
After installation, immediately disable the system’s virtual memory. When you boot Windows disklessly, the page file for virtual memory is created on the Synology iSCSI hard drive, impacting performance.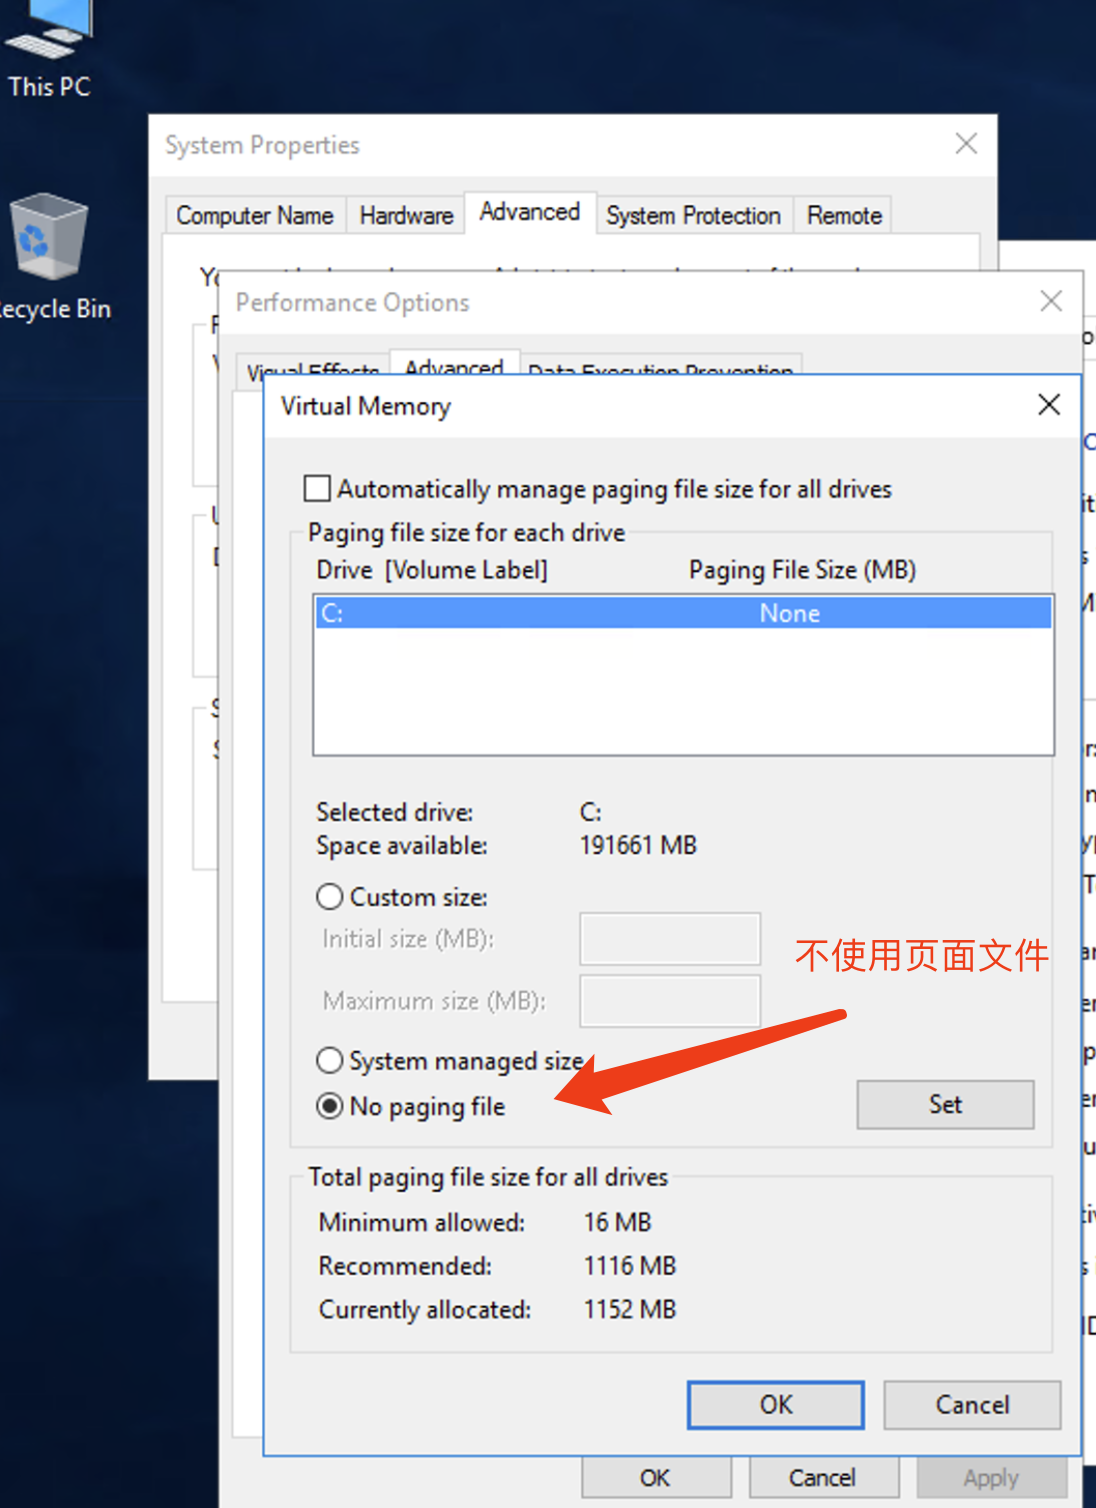
For just ¥50, this mini PC offers surprising versatility. Not only can it run Windows, but it also opens up possibilities for running lightweight Linux distributions or other projects.